HRM modules
HRM modules consist of:
- Leave types & Leaves.
- Attendance
- Payroll
- Holiday
- & related settings
Leave types
- Only admin can manage leave type (add or edit)
- Fields:
- Leave Type: Enter the name of the type of leave.
- Max leave counts: Maximum number of leaves allowed for the leave type.
- Leave count interval: This can be “Current month” or “Current financial year” or “None”. It is the interval for the maximum leave counts.
For example: If employees can take 12 Sick Leave in 1 year then:
Leave Type = “Sick Leave”
Max leave counts = 12
Leave count interval = “Current financial year”
Leave Management
- Add leave: Leave Type(dropdown list), Start Date, End Date, Leave type, Reason (text area)
- Default status of a leave added is pending
- Admin can change the status: status(pending, canceled, approved) by clicking on the leave status column button.
- Inbuilt app Notification will be sent to admin when a new leave is added.
- Inbuilt app Notification will be sent to the applied user when the status is changed by the admin.
- Only admin can delete a leave.
- Reference no. Will be generated automatically for every leave to uniquely identify them. You can change the reference no prefix from HRM -> Settings (Leave Reference No. prefix)
- Leave Instructions: You can enter special instructions for users before applying for leaves from the settings “Leave Instructions” field.
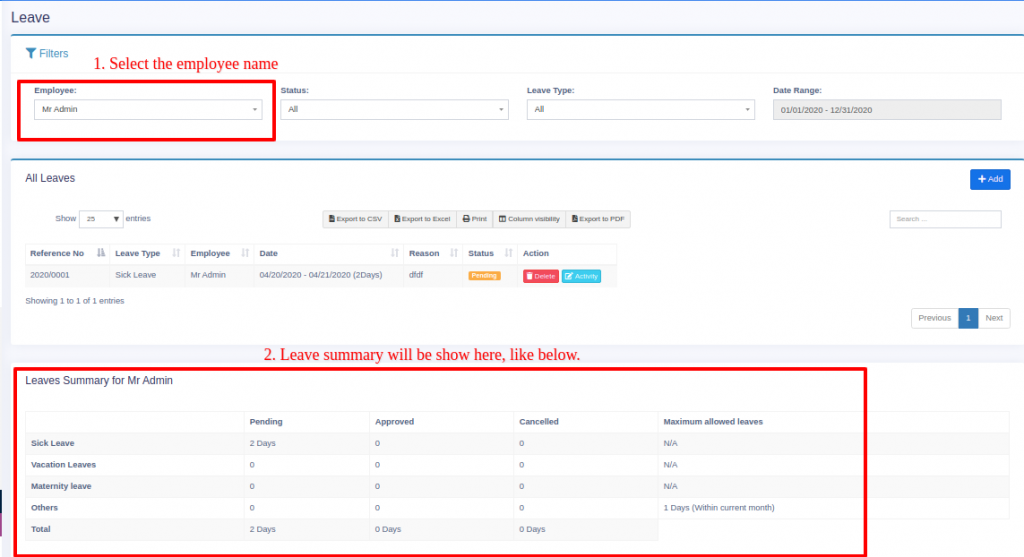
Leaves Summary for a user
- For admin: Admin can view leave a summary of all other users. On the leaves page filter by an employee name and it will show the summary at the bottom of the page.
- For Users: Always visible to a user his/her summary.
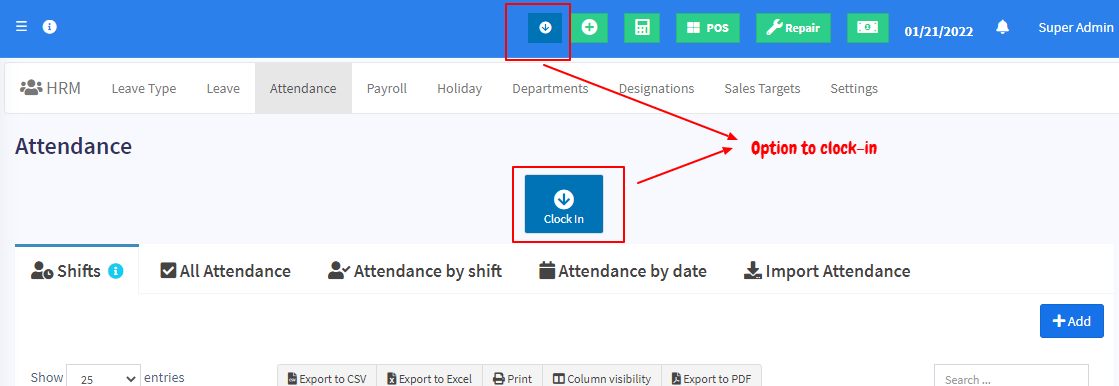
Attendance by admin & other users
- Users can add their own attendance, admin can add the attendance of every user.
- Attendance fields for admin: Employee, Date, Ip address(auto get the user’s IP address), note, clock_in_time, clock_out_time.
- Attendance by non-admin users: Users can add their own attendance by clicking on the “Clock In” button present in the top navigation bar and clock-in adding a note. And click on the “Clock Out” button before leaving the workplace for checkout and adding a clock-out note.
- Total work hours will be displayed when the admin selects a particular user and it is always visible to a non-admin user.
- If the admin wants to add attendance for users & don’t want the user to add their attendance then it can be disabled by unchecking “Allow users to enter their own attendance”
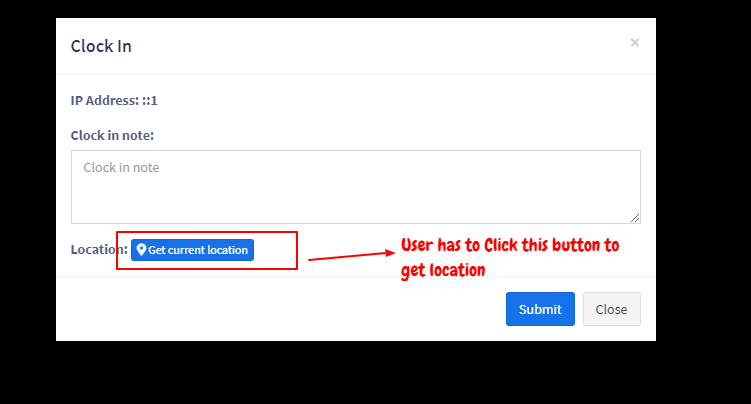
Getting users location in attendance:
When a user/employee clock’s-in the system can save the user’s location from which he/she has put attendance.
NOTE: For the location to work your website must be HTTPS
- Enabling Location:
- Go to HRM -> Settings -> Attendance Tab.
- Check the “Is Location Required?” checkbox & save it
- Check the below screenshot for locations when adding clock-in

How accurate is the location?
Accuracy of Location depends on the API & device(mobile or laptop) used and not on the application.
Mobile: mobile has GPS enabled so the coordinates sent by them is more accurate
Laptop: Most laptops don’t have GPS enabled so the location is based on the IP address, which is not much accurate
E-BentaPOS comes with 2 map API integration
- Free Open street map: It’s completely free and not much accurate. It does not require any additional configuration since it is integrated by default.
- Google map: Paid API and is 100% accurate. This needs additional configuration steps for accessing the location.
Payroll
- Only admin can add payroll & other users can view only there own payroll.
- Reference no. will be generated for Payroll. You can change the Payroll Reference No. prefix from settings.
Adding Payroll
- For adding payroll click on Add button in payroll menu.
- Select Employee and the month/year of payroll.
- If any existing payroll for the period then it will be shown for editing or new payroll can be added.
- Fields:
- Total work duration: Duration of work will be auto-calculated based on attendance
- Duration Unit: Unit of work like month/hour/week or other.
- Amount per unit duration: Price per duration.
- Total: Total work duration x Amount per unit duration
- Allowances: add as many allowances you have for the employee. Allowances will be added in final payroll.
- Deductions: add deductions for the employee. Deductions will be subtracted in final payroll.
- Gross amount = Total + Sum of Allowances – Sum of Deductions
- Inbuilt app Notification will be sent to the user when payroll is added.
Holidays
- Only admin can add holiday.
- Other users can view holidays applicable for there location.
Adding Holidays
Fields: Name, Start Date, End Date, Business Location, Note
Permission & Settings for management for HRM
Approve Leave:
By default only admin can approve leave added by other users. But you can assign the Approve leave permission to any other role & assign it to a user. User having approve leave will be able to approve leaves added by other users.
Allow users to enter their own attendance:
You will find this option in HRM -> Settings -> HRM tab. If enabled other users will be able to enter their own attendance and vice-versa.